DIY Toddler House Bed Frame / Playhouse Reading Nook

Build a DIY toddler house bed frame as a floor bed for your child or a playhouse reading nook. This beginner woodworking plan requires only 2×2 lumber, a saw, and a drill/driver.
Hi again, It’s Amy from Hertoolbelt with another great build project. Today’s project is a fun toddler house bed frame or playhouse frame reading nook for kids. You’ll also want to check out this twin-sized house bed frame, patio table with drink coolers, and adjustable double X console table.

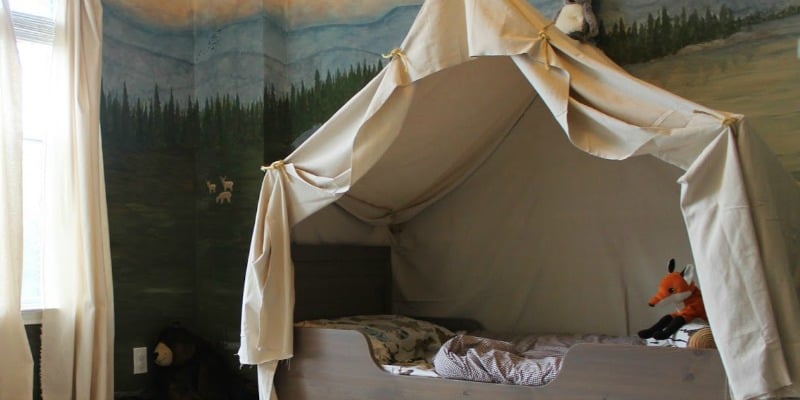
We found the original photo at From Scandinavia With Love and just had to make plans so you can build your own toddler floor bed or reading nook!
I really like the Scandinavian style designs, they are minimalist with high impact. This playhouse frame is simple to build, yet so versatile. Use the frame as is, or throw a sheet over it for a cute fort.
How to Build a Toddler House Bed Frame
or Playhouse Frame Reading Nook
The playhouse frame has been sized to fit around a crib mattress, to make a comfy reading area or easy floor bed as your child transitions out of the crib. If you don’t have a crib mattress, toss in blankets and pillows for a cozy nook.
The printable woodworking plan includes a full materials and cut list, with step by step instructions for cutting and assembling the house bed.
**As a word of caution, remember that kids can be little monkeys. Please be sure to secure your playhouse to the floor, or up against a wall through a couple studs, with some long anchor screws, to make sure it stays in place while they play!!
How big is a toddler house bed?
Designed to fit a standard crib mattress, the overall dimensions of this toddler house bed frame are 56″ W x 31″ D x 54 1/8″ H. This size gives your child enough head clearance for comfortable sleeping and creative play without taking up too much floor space.
 This post contains affiliate links. Learn more and read our full disclosure policy here.
Tools needed to build the crib-size playhouse frame:
- Miter saw (or miter box with saw)
- Drill and drill bits (optional: countersink bit)
- Measuring tape
- Paint brush
Materials needed:
(approximate lumber cost $14)
- toddler house bed frame printable woodworking plan
- 7 – 2 x 2’s x 8′ long (actual 1 1/2″ x 1 1/2″)
- 2 1/2″ screws
- 3″ screws
- Paint & primer
- Wood filler – optional
Tips for Assembling a DIY Toddler House Bed
There are several basic woodworking steps for cutting lumber and assembling the house bed to fit a crib size mattress (included in full detail in the printable woodworking plan).
- Rough cut the lumber to length.
- Finish cut the lumber, including angles.
- Drill thru holes to reduce splitting or cracking the wood.
- Assemble as shown in the plans, drilling pilot holes as needed.
Then, just sand and paint or stain as desired!
Related: Keep those kiddos safe with a DIY barn door baby gate and dutch door for stairs.
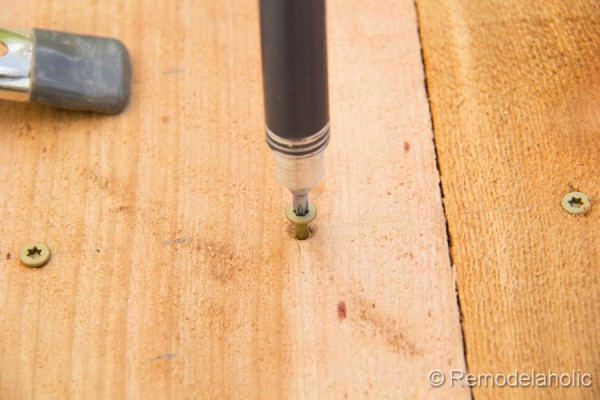
What is the difference between a pilot hole and a thru hole?
Both a pilot hole and thru hole can be used to prevent splitting or cracking boards on a project like this. (This is especially important when using inexpensive or soft lumber like pine or whitewood that is common at most hardware and lumber stores.)
A pilot hole is a hole drilled where a screw will be used to attach two boards together. A pilot hole is a bit smaller than a thru hole, even when using the same size screw. To determine pilot hole size, the drill bit should be about the size of the screw shank, smaller than the threads. This allows the screw to grab the wood for a secure hole without the extra driving force required that may split the board.
A thru hole allows a screw to pass through the board and attach securely to the adjacent board. A thru hole should be approximately the same diameter as your screw threads — larger than a pilot hole because the screw is being used to hold the board in place when the screw threads grab the adjacent board (and pilot hole) rather than grabbing the wood of the first board to hold.
Tip: When drilling the thru holes, try to stagger the hole placement when 1 board is drilled in multiple directions, so the screws won’t hit each other.
For a really nice finished look, you can use a countersink drill bit on either a pilot hole or a thru hole. The countersink bit is shaped kind of like a child’s top, and will remove an extra bit of wood for the screw head to sink flush with the wood (“countersunk”) without risk of cracking or splitting the board.

How to Finish a Wood Toddler House Bed
If desired, fill the screw holes and cracks with wood filler. When the wood filler is dry, sand smooth. Prime the wood with paint primer and allow to dry. Paint the playhouse frame with your favorite color and allow to fully dry.
Enjoy the new playhouse!
Click here to purchase the Toddler House Bed Frame Woodworking Plan.
More fun kids play area ideas:
- Indoor Treehouse Loft Play Area
- Imagination Station Kids Cafe and Art Area
- Playhouse Bunk Bed Building Tutorial
- 10 Awesome Indoor Kids Play Areas

First published 08.16.14 // Last updated 02.21.20
Amy is the tool lover at Hertoolbelt. On Hertoolbelt, Amy shares DIY furniture plans, handyman tutorials, and craft patterns. She has three pint sized 'helpers' that help fix things around the house and build fun projects.


Just an fyi. In the instructions D and E are switched from what is on the cut list it doesn’t change anything with assembly really but could be confusing for someone. Otherwise great instructions for a wonderful project that i am sure my son will love
Thanks for catching that Aaron.
Hello
May I know if you actually made it, where did you get the 2×2′ lumber?
thanks.
Hi Isabel,
We haven’t actually built this (yet!) but you should be able to get 2×2 lumber at any local hardware store or chain (Home Depot, Lowe’s, etc). Thanks for the comment!
Can you tell me the dimensions/cuts for a twin bed?
This specific plan is for a crib-sized mattress only, but this house bed is very similar and twin-sized 🙂 https://www.remodelaholic.com/house-frame-twin-bed-building-plan/
I’m having a really REALLY hard time getting the screws to go in straight. This projects seems really simple, but drilling at a right angle is actually super difficult and I’m ready to throw in the towel. Do you have any tips? Thanks!
Hi. Can you tell me what the dimensions are for a queen mattress and with slats? How would you add rails along the sides? Thanks!
Hi Tami,
You’ll want to measure your mattress to compare with standard queen size (60×80) to be sure. Since this is a floor bed, there are no slats or rails required. If you want to boost the bed up to use slats and rails, you can use a method like the rails on this house bed: https://www.remodelaholic.com/house-frame-twin-bed-building-plan/ Keep in mind that for a queen, you’ll also want a center support rail since the slats are required to be wider for the wider mattress.