DIY Wood Shutters For Under $40

Once we had our old windows replaced, we thought that we needed to dress them up a little bit more, on the outside. We decided that they really needed wood shutters. We priced out what it would cost to by new shutters and found out that it was going to be over $100 to $300 a pair. That was way too much money for us (and I am assuming you feel the same way?, am I right?). So, we started designing instead, to come up with a cheaper alternative.
The design that we came up with, is actually called “cottage style board-n-batten wood shutters with a Z bar”. We decided that we could build a pair of wood shutters for under $40. That was more like it! A lot cheaper than the alternative of buying shutters.

DIY Wood Shutters

Here is how they turned out.

We have had many requests to make a tutorial on how we built our wood shutters, so here it is.
Prefer to buy instead of build? See our picks for best exterior shutters.
Build Your Own DIY Wood Shutters Tutorial

DIY Wood Shutters Notes
- These are instructions for one wood shutter only, one side of the window. Adjust your material quantities for the number of shutters that you need.
- Screw the boards together through the back, in order the hide all the screw heads from view. Be sure the buy screws that are less than the thickness of the material screwed together and weather resistant so they don’t leave ugly rust stains on your wood.
This post contains affiliate links. Learn more and read our full disclosure policy here.
Tools Used
- Miter Saw or Circular Saw
- Drill
- Hammer Drill – For installing on brick or concrete surfaces.
- Saw horses (optional)
Material Used (enough material for two shutters around one window)
- (12) 6′ Cedar Fence Planks – About $2.50 each. This will give you a couple extra just in case!

- (1) Box of 1″ Exterior Wood Screws – About $10 per box. I used about 30 per shutter. One box can do about 3-4 shutters.
- (4) 3 3/4″ Concrete Screws – (only if you are attaching to concrete, in our case we were)
- (1) Quart of Stain – We used Varathane Wood Stain – Kona Color. This will cover 2-4 shutters.
Cut Sheet for 45″ Shutter (length x width x thickness)
- (3) Boards – 45″ x 5 1/2″ x 1/2″
- (2) Front battens – 16 1/2″ x 5 1/2″ x 1/2″
- (2) Back battens – 14 1/2″ x 5 1/2″ x 1/2″
- (1) Z bar – 27 3/4″ x 5 1/2″ x 1/2″
Construction Steps


This is how I spaced the battens. I used a scrap piece of cedar plank which was 5 1/2″ wide to offset it from the top and bottom.


To adjust the Z bar for a different height shutter: Place a board across the battens diagonally, matching up the outside corners. Use a carpenter’s square or L square to draw a straight horizontal line at the batten position. Then cut along that line using a miter saw, table saw, or circular saw.
Use clamps to hold everything together when you have the pieces in place. Then flip over the wood shutters and screw them together. This way you don’t see the screw heads on the front side. Just make sure that the screws are short enough not to poke through.
 |
 |
Use exterior wood screws so they won’t rust.
 |
 |
Now, in step five, you can screw on the back battens to offset the shutters from the wall slightly.
When we made a set of these wood shutters, we thought that it looked best to have the right side a mirrored image of the left, just like you see below.

Staining and Installing the Wood Shutters
We wanted to make sure we liked which way the z bar was oriented, so we did a couple of test shots.


Now it was time to apply the stain. We picked a dark chocolate color stain called, Kona.

Just apply with a foam brush and wipe off with a clean rag. The cedar wood soaks up a lot of stain, so plan on using a little more than one pint per shutter.

All ready for install now.
Installing Exterior Wood Shutters
Ours are installed on the concrete foundation walls, so I needed a hammer drill to drill holes for the concrete screws.

 |
 |
Use a block on the bottom to set the shutter to the right height, when installing. This is great if you don’t have another hand to help hold it up.

I used (4) 3 3/4″ concrete screws to hold the wood shutters to the wall. Because the screws were blue, I took a cotton swab and applied a little bit of stain to camouflage the blue screw heads, worked like a charm!

Here is what the original window looked like, before being replaced.

Here is the new window installed.

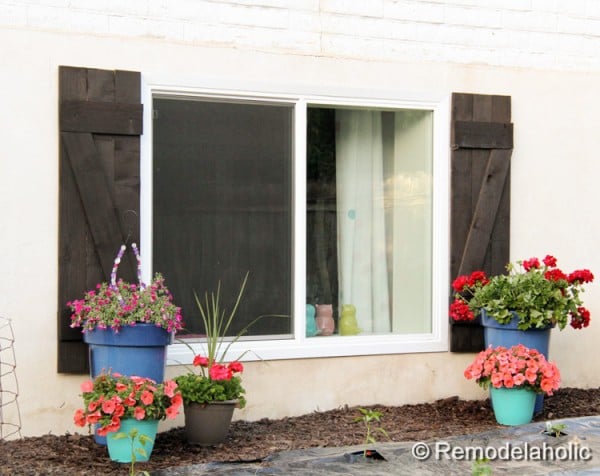
And here is the new window installed with wood shutters. I think it looks so much better, don’t you?
See more of the projects we did in this Canyon House yard here.
Click here to get a printable version of these instructions.
More easy ways to improve your curb appeal:
- Exterior Paint Colors that Add Curb Appeal
- Beautiful Front Door Paint Colors
- 25 DIY Curb Appeal Ideas
Please pin this to share and save for later!


I am the husband of the amazing Cassity of Remodelaholic. I love to problem solve and to design and build things inside and outside the house to make life better. I am a professional Landscape Architect by trade and love the outdoors.


Bomb dot com for sure! These are adorbs. And they look super easy to build.
Those turned out fantastic! If you really want them to look real, you should add some decorative vinyl shutter hinges and s-holdbacks. They still won’t be functional, but they give the impression that they are. You can find a set for two shutters on amazon for $14. That’s what we’re planning on doing when we finally get around to making our shutters! BTW, great idea putting the two pieces on the back. We hadn’t thought of that.
Thanks for the tip Loribeth!
another super project. kicking butt. cheers. ~jb
Great work, these look stunning! Got any posts about window boxes? Hehe… I need some 😀
Jesse, we don’t have any window box posts that I know of. Maybe that would be something to have in the future. Thanks for the idea!
These look awesome!!! Great tutorial too:)
xo, amy
Thank you! We are so happy that we made them!
This exactly what I was looking for. Thank you so much for the instructions and photos. I love the look and have been wanting something like these shutters for our log cabin in North Carolina. I’m off to the hardware store tomorrow.
We made the board and batten style shutters for our twice. The first time we used wood. They split after awhile, though. We went to Lowe’s the next time and found some pvc wood boards and made them this time. They said not to use very dark paint on them, though (?). We painted ours a Saltbox blue color and have had no problem after 3 years.
I almost NEVER comment on help/DIY articles I get from the web, but I this is too good to not thank you for!! You helped me increase the curb value of my home exponentially with a TINY price tag and an afternoon’s worth of work. Thank you!!
You’re welcome! So glad to help!
I love these shutters. They turned out great , I hope to be able to add some to our home soon.
I’ve got a question about the new window you installed, did you guys DIY it or have it done professionally? If you did DIY it, I would LOVE to see a how to on that. We’ve got a window that needs to be replaced (we even have the replacement window already) and I’d like to DIY it but am pretty nervous about. I can’t wait to get the new window in so I can add some cute shutters like yours. Thanks for sharing 🙂
Hi Meg! We had it done professionally. So nice to let someone else do it without worrying 🙂
Thank you! I too had sticker shock over prefab shutters. Your tutorial makes it easy! Plus real wood is much nicer. I’m going to map out this project for my cottage this weekend.
You’re welcome! And I agree, I love real wood. We’d love to see pictures when you make yours!
I love your tutorial! We are planning to make these, but can’t find the 1″ exterior wood screws around here. Lowe’s, Home Depot, Dunn Lumber, no one has them. The shortest length is 1 1/4. Can you please tell me where you purchased yours? Thanks!
Sorry that you had a hard time finding the screws. I found this link for some one inch screws at the home Depot that would work. You can use any outdoor screw at 1″. Some times they are hanging up in small plastic containers.
have these lasted up over the years? i figured the reason you picked cedar fence planking was you knew it would be sturdy–i saw another commenter saying their wood shutters split after a short time. That’s my only concern with using wood—how long will they last?
They are doing great, and they are south facing with full sun all day long. Wood obviously has a certain lifespan, but I feel like vinyl product fade So badly as well, so you kind of have to pick which problem you want to deal with…
Thanks for the great tutorial. I will use your guide lines to build my shutters. Mine are 6″10″x18″ but your pattern will give me a good idea for a reference. Thanks again Larry Glodt
I am a single mom who has a very tight budget. I am somewhat handy but did not realize I could make these myself until I saw this video. The ones I saw on line for the size I wanted were 200.00 dollars a piece. Ridiculous!! Thanks so much for sharing. I know I can do this after seeing it step by step out. Maybe you can post other projects you do in the future. your instructions are way clear.
Thanks, Tammy! You can see all of our projects here on Remodelaholic.com — we’d love to have you browse around and see what inspires you 🙂
Almost cried when I saw you covered up that beautiful cedar color with dark stain x_x
I liked the cedar too but the darker color looked so much better with the exterior of the house. But the good news is, you can make them yourself and leave the cedar! 🙂
Do I need to use pre-treated lumber for these?
Curious to know whether these designs could be used for a functional shutter with the addition of hinges and barrel bolts. Would that be able to protect homes that face storms and hurricanes seasonally?
Great tutorial! Thank you for the idea of using the cedar planks. I love the dark rich color. I have been debating about what wood to use.
I have to ask why you added the back batten pieces to push them away from the wall? We have existing shutters (needing to be replaced because they are rotted) that are directly screwed onto our cedar shake shingles.
Wondering if there is a purpose for that. Thank you.
I can’t wait to build these! I have a cedar beam in my house so I want to make shutters to match them. Where did you get the cedar planks? Could you send me a link to them if possible so I know what I’m looking for? There are so many types of cedar wood at Home Depot. Thanks!
I picked up the cedar planks at my local Home Depot. It was the only option they had. They are cedar fence planks.
Did you hVe to seal the wood to protect it? I want to make these but paint them instead of staining them. My hub thinks the wood won’t hold up very long. What do you think?
We didn’t, but you can always do that to help it last longer for sure.