Easy Folded Paper Mini Wreath Ornament (Paper Christmas Decorations; Day 5)


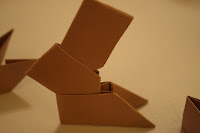

Now take one of the folded pieces with the pockets up, and stick the points of the next piece into the pockets of the first piece. (see images above, although it will be flat not in a v shape) Then, just continue adding pieces into the wreath until you get them all in. At that point if it is not the proper shape just push it into shape. Done!


Cassity Kmetzsch started Remodelaholic after graduating from Utah State University with a degree in Interior Design. Remodelaholic is the place to share her love for knocking out walls, and building everything back up again to not only add function but beauty to her home. Together with her husband Justin, they have remodeled 6 homes and are working on a seventh. She is a mother of four amazing girls. Making a house a home is her favorite hobby.


>Nice rings! I like the "Peace on Earth" block…where did you get it:) j/k
Are those branches real?
>um can i come live with you? :))))
>i stumbled across your blog, and i love it!
i am a daisy girl scout leader, and we had our "homemade ornament swap" today, my daughter chose the day 2 ornament (not the daisy one that i thought!) and it came out so cute.
thank you!
Melanie :0)
Danvers, MA
>Parabéns pela postagem.
As guirlandas ficaram bem bonitas.
Até logo 🙂