Knock Your Socks Off!; EASY Homemade Christmas Stockings
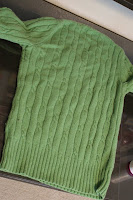
I know I am cutting it a little close, I mean Santa is coming in a few short days…. But now that we have Etta, I decided I wanted new stockings. Growing up my mom made us some really fun crocheted granny square stockings, that just spoke Christmas. So, I just really wanted yarn stockings. BUT, I didn’t have time to crochet them, story of our lives I’m sure! The other day, while I was at my favorite local thrift store shopping for tacky Christmas sweaters…(post to come) I picked up a few other sweaters as well to make this:

It was SEW easy! If you can sew along a line on a sewing machine you can make this.


1st Pick up a few sweaters at the Thrift store (or your closet!)
2nd. Launder them and remove any lint etc.
3rd To begin, turn sweater inside out.
4th Smooth out the sweater so that the bottom edges are lined up together (this is most important because the bottom of the sweater will become the top of your sock)
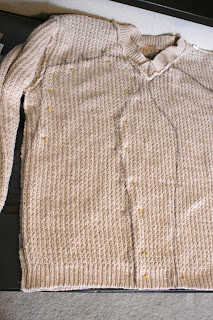

5th Now trace a stocking shape onto the sweater with the opening of the sock aligning with the bottom of the sweater.
6th after tracing pin the sweaters front and back side together along the drawn sock.
7th Sew around with the sock shape ***With light tension and the longest straight stitch. (this way the fabric will not pull and pucker)
8th Remove pins and cut out sock with about a 1/2 in seam allowance.
9th Sew around the sock again, and then zigzag just outside of your straight line to make sure it is secure
10th Flip right side out, at this point the sock is done.


You will need a small loop to hang them, you can use what you like to create a loop, and attach it to the top back of the sock. Honestly I haven’t done this yet, so I just used a binder clip, don’t tell Santa!
One little trend in the Christmas sock area that I have noticedthis year especially, is just hanging a letter on the sock, instead of having their name on there. And I tried it too:

1st print out the first letter of all the names in your family.
(we have Mom, Dad, Etta, and a small Kitty and Buddy!)
Print them out backward ( I just flipped the image horizontally in Photoshop)
2nd Glue them to a sheet of chipboard ( I used an old gift box, the ones you always have kick around)
glue to the front of the chipboard a paper that you like, (this is what will show)


3rd I beefed up my letters with a sharpie, til I thought it looked decent. (not necessary, I just wanted to)
4th Cut out the letter, and hang with the sock!

The final result:
Unfortunately we don’t have a fireplace, so I hung them on the banister!

Social Retargeting by Chango
Cassity Kmetzsch started Remodelaholic after graduating from Utah State University with a degree in Interior Design. Remodelaholic is the place to share her love for knocking out walls, and building everything back up again to not only add function but beauty to her home. Together with her husband Justin, they have remodeled 6 homes and are working on a seventh. She is a mother of four amazing girls. Making a house a home is her favorite hobby.


You make this look so easy. I really need to update my girls stockings! Just fabulous.