DIY Simple Wood Slab Coffee Table

Hey there Remodelaholics! Nina from Everyday Enchanting here to share our latest furniture build- a DIY Wood Slab Coffee Table! We have many projects in the works in our 1980s fixer upper (some days I feel like too many!) but one side project is our family room. It was one of the only rooms in the house where the changes are mostly cosmetic/decor-related rather than structural, with the exception of our fireplace remodel. We have been chipping away at filling the room with furniture and decor we actually like, while on an extremely tight budget. Last time I posted here I shared our Ikea Hack/Pottery Barn Knock-Off Apothecary Cabinet, and today is following the same theme- my Pottery Barn taste on a DIY Budget!

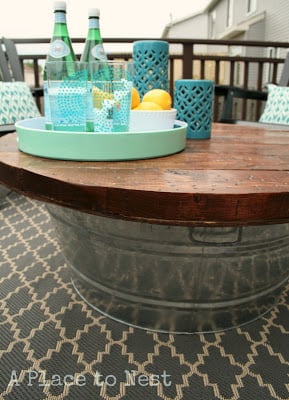
This is a lovely reclaimed wood slab coffee table with metal legs. I loved the industrial-meets-rustic style, which was needed in our space to offset the relative femininity of the fireplace and the tufted slipper chairs that are on the way. I loved the way the black legs played off of the black hardware on the apothecary cabinet. I also loved that I could vacuum under it! (This is a big thing since our golden retriever Lucy sheds a lot!) So, What didn’t I love? The $699 price tag.
I know a lot of the reason for the price is undoubtedly the reclaimed pine slab and the metal legs. So I began to brainstorm how we could get the look for less, using more modest materials. We recently had great success building my mom a farmhouse table using 2x8s. I thought we may be able to achieve similar results to this table using a combination of 2x8s, 4x4s, and 2x4s. Here’s what we did!
DIY Simple Wood Slab Coffee Table
Dimensions: 51″ w x 32″ d x 19″ h
Cost: Approximately $50
Materials:
- 2 – 2 x 8 x 8′
- 1 – 4 x 4 x 8′
- 3 – 2 x 4 x 8′
Time: 1 1/2 hour build time and 24 hours before stain and poly dry
Step 1: The Tabletop

We cut the 2x8s down to 4 pieces at 48″. We then glued and clamped the planks together before attaching them with two 2x4s cut down to 32″. We have received questions in the past about whether we experience the tabletop cracking with this method (since there isn’t a lot of room for expansion and contraction)- the short answer is that we haven’t experienced cracking, even though we have a 5 year old table built with this method. Even if we did- we like rustic furniture. If you feel comfortable with biscuit joinery, go right ahead and substitute it in for this step- but for the sake of keeping this tutorial “beginner friendly”, we will stick with our method… 😉

After that, Mack (my husband) had the great idea to add the illusion of thickness by wrapping the tabletop in 2x4s. It would give a similar look to the reclaimed wood slab, and also effectively hide where we attached the legs! We mitered the corners and ran the 2x4s through the table saw to give them a straight edge. We then glued, clamped, and nailed the 2x4s onto the perimeter of the tabletop, taking care to make sure they were flush.
Step 2: The Legs
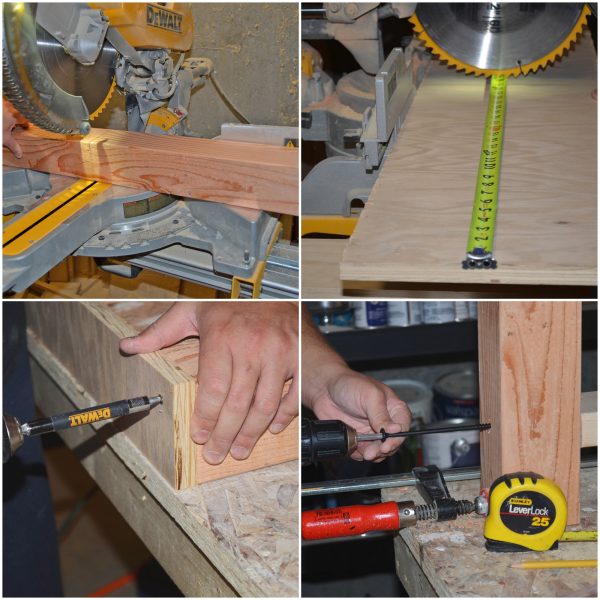 We opted to use 4x4s cut down to 17″ for the “faux metal” legs. We joined them at the top using a piece of scrap plywood cut down to 3.5 x 26″. We then cut two 2x4s to 19″ and attached them at 4.5″ from the ground. We used long rustic black screws to attach them, and then nailed in at an angle from the opposite side to prevent spinning.
Step 3: Stain

I sanded all of the parts with 60 grit sandpaper, since the wood was pretty rough. Then I went back with 120 to give a silky smooth finish. We did two coats of Minwax Dark Walnut stain, following the manufacturers directions. Once that was dry, we did two coats of polyurethane in satin.

On the legs we used an all-in-one stain and poly called Polyshades in ebony. It had really great coverage and only took two coats!
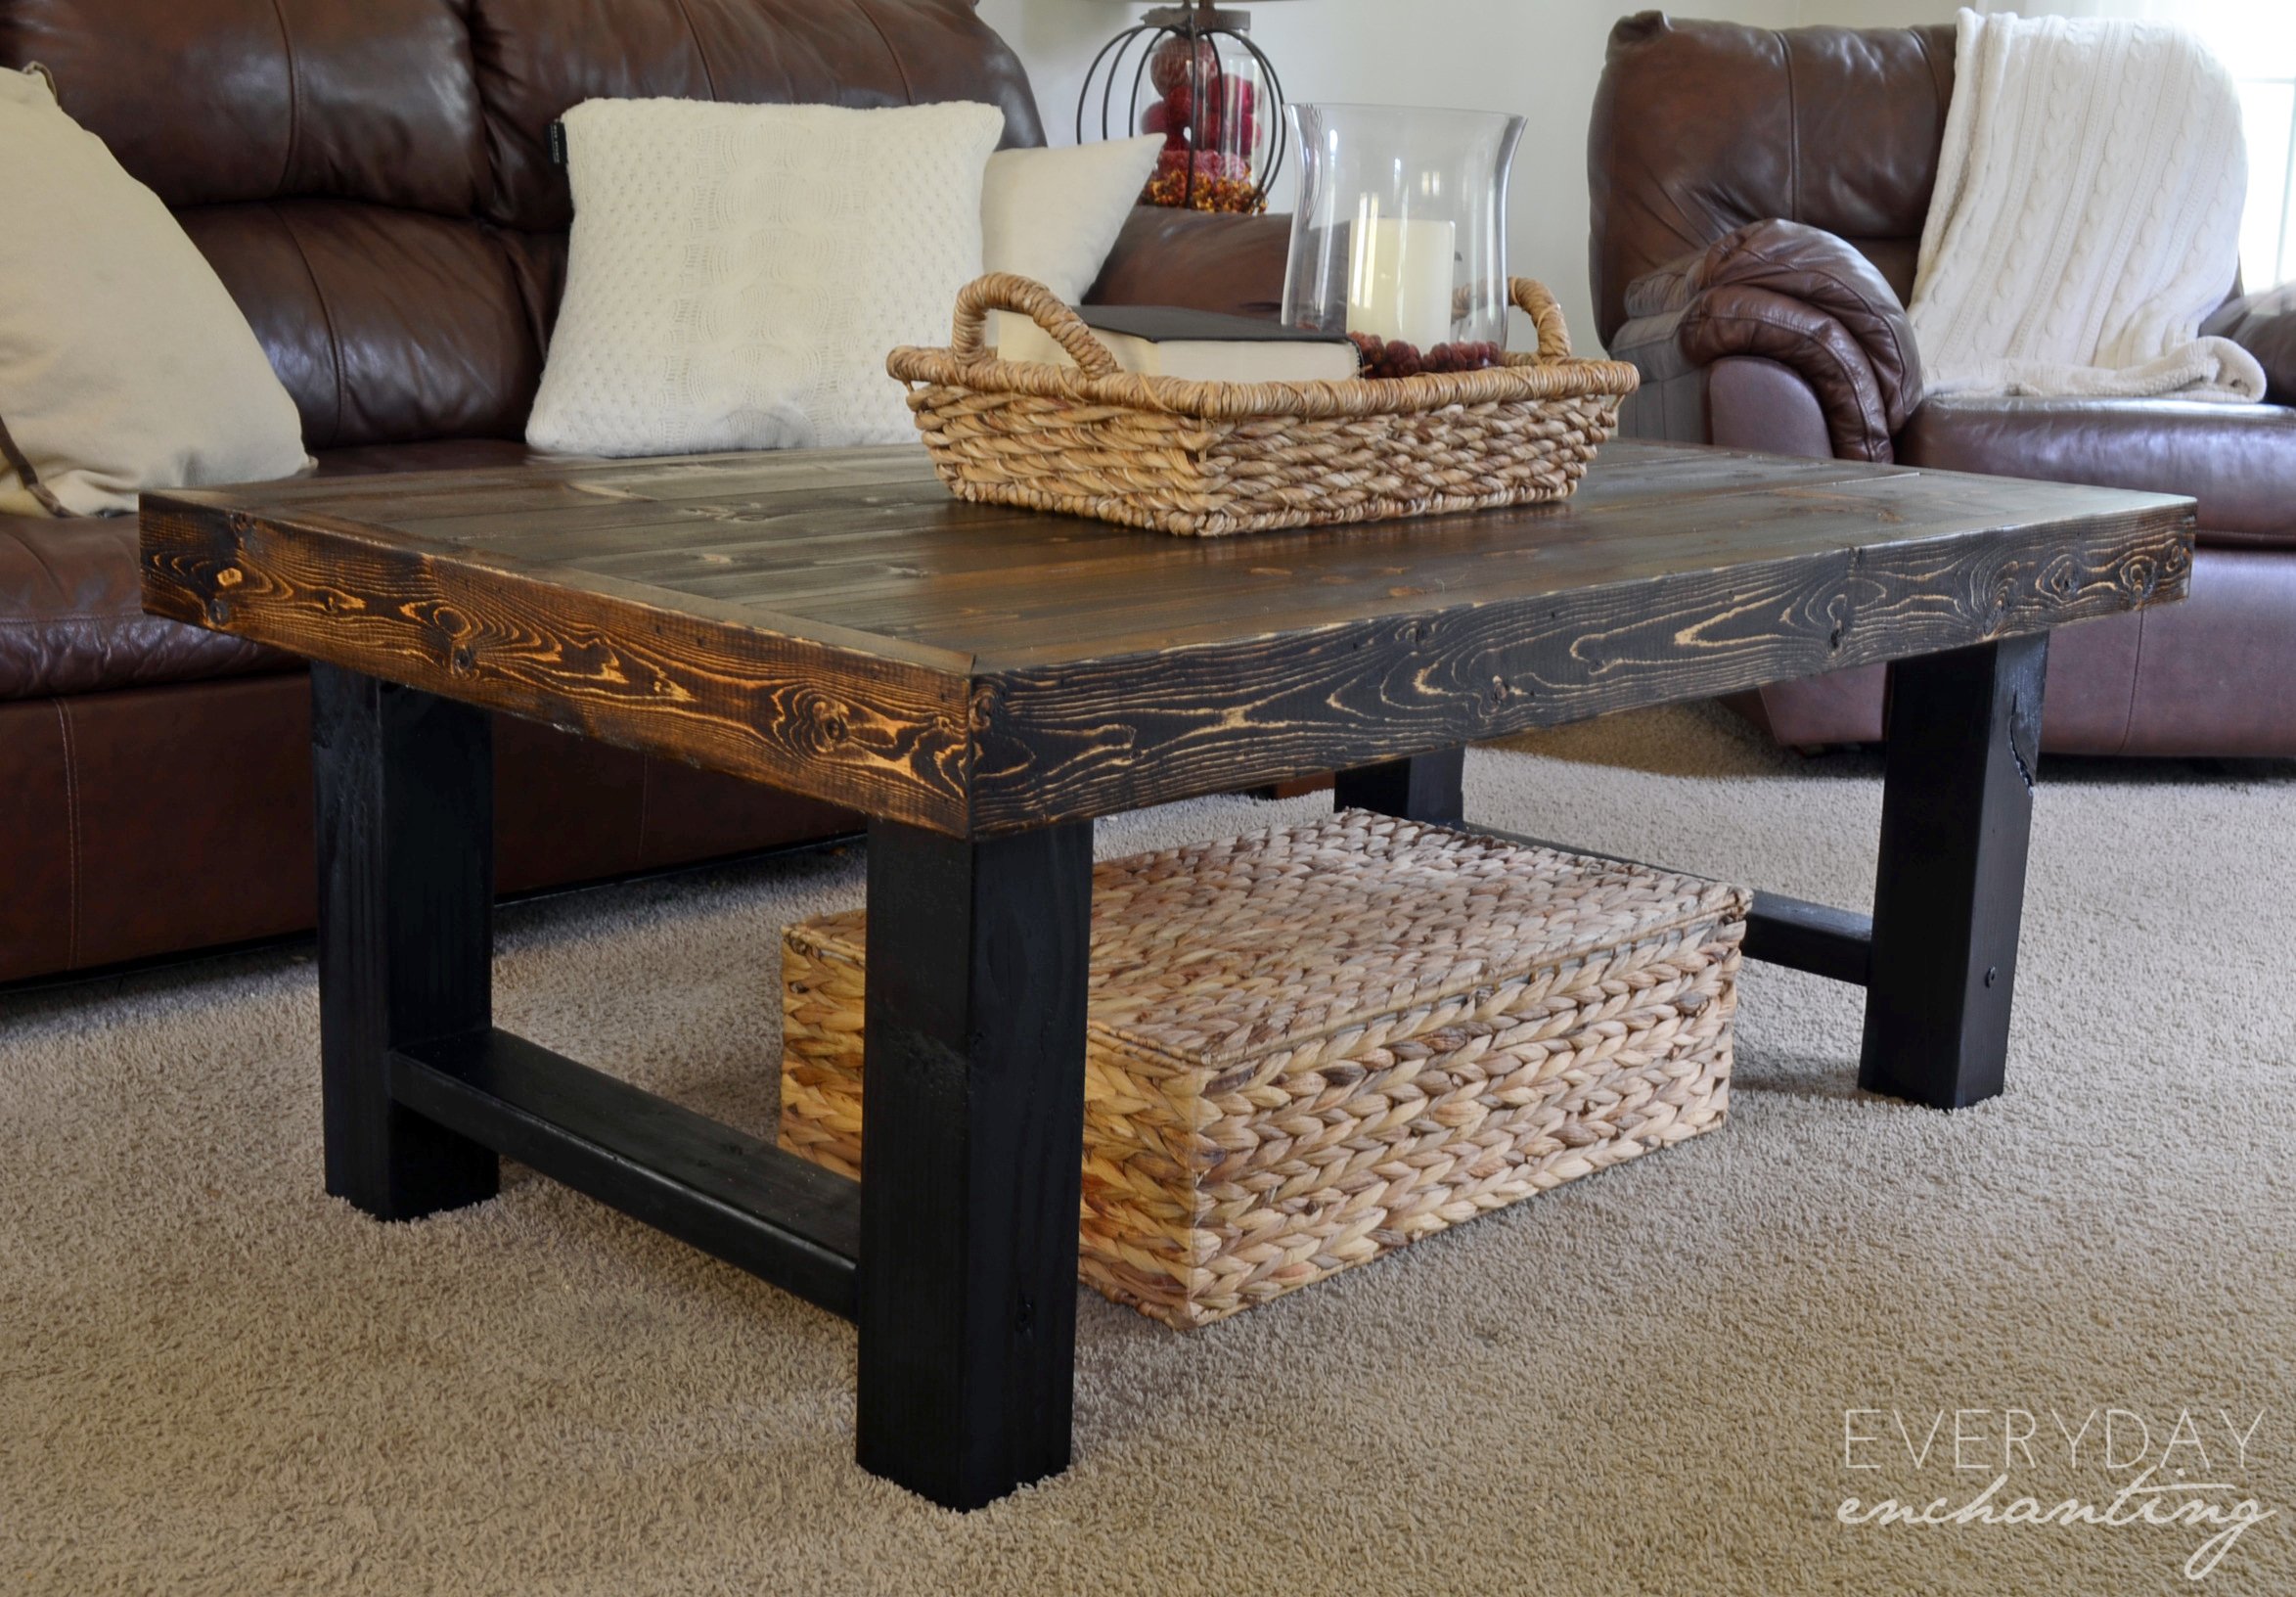
After the requisite drying time, Mack brought the table upstairs and attached the legs to the table using basic wood screws. Then I had fun styling it! It is so nice to have a coffee table, and especially one that will hold up to the wear and tear it’s sure to get from our kids. Overall, this was a simple and quick project, and it fits with the style of the room perfectly. Of course, the fact that it was only $50 doesn’t hurt either!
—————————————-
Check out more DIY coffee tables here, like these:


Thank you very much! I know EXACTLY what I’m going to do with this idea!!
wow, I love this!!!!! PINNED
This is a great table! I’m going to add it to my to do list for my playroom. I want to get rid of the train table and get a little more grown up. This seems simple and pretty. I will link back to you when I do it.
LOVE THE TABLE! LOVE THE PRICE! I am constantly thinking of ways to cut a budget. Thanks for the easy instructions too
What an awesome project for do-it-yourselfers! It’s so sturdy and stylish…I love it!
I love this idea! I am just starting to get into DIY and am TRULY a beginner. I appreciate your step-by-step instructions and your images. It really helps. Can you recommend some basic tools that would be good for me to purchase that would be perfect for this project but also good for using with other future projects? I am really just starting from nothing! Like saws, clamps, nail gun?? I feel kind of silly for asking. And if any readers have suggestions, please chime in. I keep wanting to do this sort of thing but I get frustrated with the fact that I don’t know what tools I need to do the job in the best way. 🙂
Hi Paige! Thanks for the question. We actually just recently wrote a post about this, over with our friends at eBay — https://ebay.to/1DVcbkB. It’s a good reference to get you started, but there are all sorts of great tools depending on what you want to do. We also share lots of tips and recommendations over on Facebook, and we have a great DIYing community of support there, so we’d love to have you join us there, too — https://www.facebook.com/remodelaholic. Thanks for reading!
We love this table and had to feature it! Thanks for the great tutorial! Check it out https://ana-white.com/node/13801
“Ana White and Team”
Thank you so much for the feature! We LOVE your site and are so flattered to be featured. Nina does great work!
Hi!
I love the look of this coffee table and would really like to modify it for an entertainment console. The only problem is that I am a complete newb and have only ever put together pre cut and pre packaged furniture! If i wanted to make the length 72″, I figure there would need to be an additional brace under the table top..would that be sufficient to make it structurally sound, or would it need a middle leg/brace from the ground?
Oh! and I would make it a little taller to accommodate a subwoofer that is 18″ tall. Does this sound plausible to you?
Thanks!
I am new to the DIY world but have done some woodwork with my Dad growing up. Was wondering if you have a quick tutorial somewhere on how you mitered the corner 2×4’s to go around the edge of the table. Other than that I think I have a pretty good grasp on the table itself and may take a crack at it tomorrow!
Thanks for the great idea!!
Hi,
Lovely table! Can you tell me what type of wood you used?
Hi Mel,
The 4x4s are douglas fir and the top is white pine 2x4s.
Hello- This is a beautiful table.
Do you have a cut list for this project?
Thank you!
Hi Chelsea,
Thank you!
2 – 2 x 8 x 8′
1 – 4 x 4 x 8′
3 – 2 x 4 x 8′
Amazing work !!! I I’m over the moon to see step by step instructions to do this coffee table, I have been hesitating to start DIY furniture because I know I won’t stop after that 🙂 … I have one question regarding the legs, how do you attach them to the table top?? screw then from the top??
Bumping this question for a reply please! So excited about this table but how did you attach the legs? Thanks for the instructions!!!
So sorry for the delayed reply! The legs are connected with a strip of plywood at the top (it’s there in the black stain photo, but it’s blending with our workbench). From there, we attached the tabletop by flipping it over and screwing through the plywood connector into the bottom of the tabletop. I hope that makes sense!
How much do all of the tools you used cost, because I am poor and don’t own any of them. I’m guessing more than $50.
Hi Danielle, I totally understand that! This wasn’t our build, but looking over the instructions again, you could build this with a miter saw and drill/driver — so more than $50 but a good investment for future projects 🙂 (The clamps are also really really helpful, so I’d recommend those as well!)