Built in Storage for Family Room
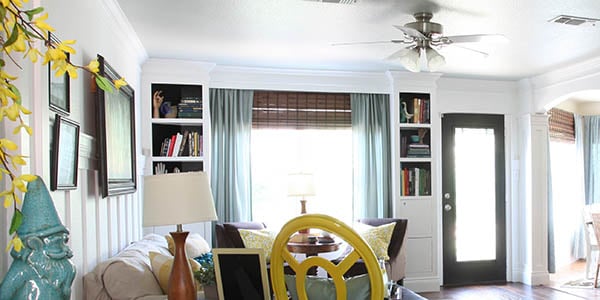
I have shown you some snippets of our most recent BIG project – adding some MUCH needed storage to our family room, but you are sorely lacking in detail… Well, I am finally here to give you the whole shebang (actually it is a bit long so it may take a post or 5), and show you what we are currently doing to finish the project… yea!
First let’s talk about the mess that was (and still mostly is) our family room. Luckily, it is on the second floor of our home, so the daily mayhem isn’t visible from the front door. But it is the room we hang out in about 65% of our day.
It is the catch all room for: (items bolded for skimmers)
- Almost all of the girls toys. I think that any mother with young children knows that stuffed rabbits multiply as fast the real ones, and pretty soon, your are overtaken with kids toys. In my opinion, this is not a room that is meant to be on display… (except for maybe my blog, but that is just sort of a weird facet about home blogs, every room has to be a destination?!?). The important thing for me is that my girls feel as welcome and entertained in our home as I do- it is no longer all about me. I may not like red Kool-Aid in this room, but crackers crumbs, apple wedges, stray threads of string cheese are a common day occurrence. and toys are a necessity that may or may not be put away everyday.
- We have our TV in this room. We may be a strange American family in that we only really have one real TV, (we have a small 19 inch downstairs just for movies, when I am trying to cook dinner) no cable and no antennae. The truth is I don’t have a lot of time for shows. I do watch a few on PBS (we just found this and I LOVE it when I just wanna veg.) and Hulu: This Old House, Once Upon a Time, Terra Nova and Biggest Loser (tangent – I have always loved Bob, but I now LOVE Dolvette too. Anyone else in love with Dolvette?! Oh my goodness, not only is he AMZAINGLY beautiful, he is kind/motivating/good! So inspiring) So, what do we do with this TV? We watch some movies (usually in Dutch or Leap frog nowadays), listen to music, and we just got a Wii fit for Christmas plus a Zumba game and Just Dance, if we are playing video games, the requirement for me is that we have to be moving to do it.
- Movies and CDs – yes, I still have my cd’s… But honestly, I think I am beginning to see the light of digital copies… but technically you can’t just get rid of the original can you?
- Our piano is in this room. Music is a huge thing in our family and I have been singing and performing all my life, but I have never taken piano lessons. I taught myself how to read music and basically play when I was 13 and on, but I haven’t had much of a chance to practice since it is next to the girls rooms. But someday, I will be the mean mom that requires that my kids take and practice the piano… I will probably take lessons with them then too. So longs tory short, we also have a ton of music books to be stored up here.
- The cabinets need to be able to house bed linens… wow, that sounds so Martha of me (lets get real, I mostly just call them sheets)
- All holiday décor minus Christmas trees.
- Games– we have a million! And I would love some good suggestions…
- Magazine- I still have a few too many subscriptions… I need to narrow them down, I don’t even have time to read them anymore, and I am getting sick of the clutter. (I can tell it is cleaning season, cuz I am so ready to purge!)
Okay now, you want to see the mess? Admit it, you know, you do…
When we cleaned out the closet for the play house this is what happened, every ledge became a new storage space for anything and everything, enjoy:

A bunch of our games, and other randoms!

Our piano music, magazines, and misc décor items plus the awesome carpet bag from my childhood that holds all the loud noisemaking music toys any parent would hope not to have. (you gotta admit it is a cool bag!)


Toys…honestly this was actually looking pretty good, at least the Huggies box was corralling most of the crap. It is sad to admit, the number of toys and books, (there was a library sale a while back) has definitely increased!
Originally our plan was for “built ins” that would actually be individual pieces we could take with us when we leave. We were trying to build it to integrate this half wall.
")
Below is the original drawing. Each section, each bookshelf and even each bench was movable, I still love this idea, because we tend to move a lot. But, the biggest issue for me was all the ledge space. I never used to be a “pile-r” but now that I have kids getting into everything, at every moment of the day ALL elevated surfaces out of reach is a collection point for whatever they are not supposed to be getting into- lotion, chap stick, important papers, sharpies… (you think I’d just put them away, but that would be the logical thing to do) So, that was the first down fall of this first version, it would never look this clean and nice.
Finally, this house doesn’t have a fireplace. I have ALWAYS wanted a mantel to decorate, and I am going to be honest that blogland only makes me want to have one even more. I LOVE seeing everyone’s cute mantels. Which made me think, Heck! Why not have a fake mantel for stockings and holiday decorating!

Probably the biggest reason for the big change from the original plan was that our friends from church who also live in our neighborhood, mentioned that there was a big empty space in their stairwell. Huh? Where? They have a different floor plan, so I wasn’t sure if we had that same wasted space, but I decided it was worth inspection… so, when Justin was away at work…(I sound so devious… incidentally this is the same day I decided to rip out the shelves in the playhouse, I must have been needing some exercise) I cut into our wall to peek in there thankfully it was empty!!!
")
When I mentioned the issue with ledges, it was Justin’s idea to take the cabinets all the way to the ceiling, and I am so glad he volunteered for more labor, it is so much easier than asking!
The other great thing that the height did for the space was hide an awkward ceiling transition… which was kind a messing up the ability to add crown molding without awkwardness.
")
")
So what is the plan? Well here is the final sketch:

It is so satisfying to see that the plan is pretty much done. Albeit with a few little changes… and just a bit more to go till it is completely done. The original project was done for House Logic. And because of time and budget constraints for the projects we decided to axe the mantel for the first go round, with the plan to update it when time was available. Well, it finally is, but since I haven’t shown you the rest of the project, I think we need to do that first? Are ya with me?
Luckily, this is one of the simplest demo projects to date. It is nice to get into a project quickly, with such a fast return on investment. We removed the base moldings and moved the handrail… then deconstructed the empty box, which accounted for a gain of about 30 square feet of new storage space.
")
")
")
Marking the cut for the drywall. Justin removed the original drywall in one huge piece ( I tell you the boy has talent!). After, we were able to reuse it behind the cabinets to help seal the wall back up, since as you may know the insulation in the house sort of bites… as seen here.
")
")
The next bit of demo was pretty straight forward, since the 2 x 4‘s were just there for looks and not structure.
I will admit that once the wall was gone I was really tempted to just leave it open, it really made the space feel so big… but it would have just been a worry warts headache, since it would become the place to jump off of… not such a great idea!
This is also where we hit a little snag. The electrical was not in the wall, but running through the box.")
So, at this point we had our electrician friend over to help us out with installing some new circuits… since the electrical in this house sort of bites… (seriously, this builder just ticks me off!) half of the electrical is on one circuit, half on another for the entire upstairs In this age of electronic devices there has been a huge strain on the circuit and it was tripping all the time.
")
It was patched back up pretty quickly and we slapped up some plaster, mostly to just make sure there weren’t extra drafts since this is almost all covered up with cabinets.
")
Finally he re-attached the original drywall that used to be on the outside, onto the back wall, sealed up any holes and plastered again!
")
So that is it for today. I will show you how we (to clarify, 98% Justin) built the cabinets next!
Also see Building the Built-ins! Part 1 – post 2 and Building the Built-ins; Part 2 – post 3
Cassity Kmetzsch started Remodelaholic after graduating from Utah State University with a degree in Interior Design. Remodelaholic is the place to share her love for knocking out walls, and building everything back up again to not only add function but beauty to her home. Together with her husband Justin, they have remodeled 6 homes and are working on a seventh. She is a mother of four amazing girls. Making a house a home is her favorite hobby.


And I’ll be showing this to my hubby!!!! haha. 🙂
I hadn’t even realized that the storage wall went over the stairwell, too, when I saw this project on HouseLogic. I’m even more impressed that you 2 finished this project so quickly. You guys are amazing! Thanks for sharing.
Can’t wait to see what the next phase of this project looks like!
Ooh, so exciting! Yeah, I know it’s already DONE, but I love seeing the step-by-step!
How exciting for you! Storage is so important and sure helps to keep things organized. I am looking forward to your next post!
I cannot wait to see the progress on this! I secretly (not so much now that I am admitting it I guess) dream of storage like this and maybe will be inspired enough to bring it up to my contruction business owner husband who can do anything but is sooo busy. This will just have to become a priority. He’s going to loooove you!
Wow! That is going to be stunning Cassity!
I’m always envious of “pretty” storage.
Can’t wait to see the after shots 🙂
That’s a great sketch! Can’t wait to see the final reveal. 🙂
Anna
http://www.askannamoseley.com
Thanks Anna! I love me some graph paper!
Your sketches are wonderful! That is going to be SUCH a great space when you’re finished!
If we were going to be staying in our current home for a long period of time, we would probably need to do the same type of permanent storage system.
And just to let you know, you CAN get rid of CDs and have everything digitally saved. When I got my first iPod, I loaded all of my CDs (102)onto iTunes and held onto the originals. They spent over 5 years in a box in the basement. In 2011, I vowed to remove 2,011 items from my home and, getting rid of these 102 CDs, felt really good. Of course, I also made sure that our Carbonite program had uploaded all of the music in case the computer crashes.
Purging is not a dirty word.
That is good to know, i just didn’t know if it was illegal to rip them and then get rid of the cd, ya know what I mean? I agree purging is not a dirty word! I totally need to get on that!
Cassity
I love the addition of the mantel. This is such an exciting project! I can’t wait to see how everything turns out.
Sharon
Great start!
Wow! This looks amazing. You are so much more motivated than me!
Belated blog hopping from Singing Three Birds
I can’t wait to see how it turns out! We could use some more storage space!
Ohhhh can’t wait to see it all finished- going to be beautiful!! Thanks for sharing at Feathered Nest Friday!
Looks awesome…so excited to see the finished project. Keep us posted! Thanks for linking up to Strut Your Stuff Saturday! We would love to have you back next Saturday to share more great ideas! -The Sisters